Be.Smart Site Management
  • â„šī¸What is Be.Smart Site Management?
  • âš™ī¸Requirements
  • 💾Supported file formats
  • 🆕What's new ?
    • Q1/2023 Release
    • Q2/2023 Release
    • Q3/2023 Release
    • Q1/2024 Release
  • Getting started
    • Project set up in Trimble Connect
      • Create a project to Trimble Connect
        • Create a blank project (Trimble Connect)
        • Create a project based on template
      • User management in Trimble Connect environment
      • Project settings in Trimble Connect
    • Project set up in Autodesk Construction Cloud
      • Create a project to ACC
        • Create a blank project (ACC)
      • User management in ACC environment
    • Project set up in Site Management
      • Site Management - Project configuration
        • Coordinate reference system
        • Project location
        • Toggles
        • Coordinate formatting
        • AIS marine traffic
        • Application background maps
        • Background maps
        • Overlay maps
        • Default background map
        • Default models
        • Project links
        • Connections
        • Permissions and Metadata
      • Settings for Site Management
  • Site Management
    • Project interface
      • Toolbar
      • Project tree
      • Map interface
    • 📐Measurement tool
    • 📈Elevation tool
    • âœ‚ī¸Section tool
      • How to create a section
      • Measurements in sections
      • Breaklines in section
      • Print tool in a section
    • đŸ–¨ī¸Print tool
      • Print tool options
    • 📏Inspect breaklines
    • âœī¸Markings
      • Creating a marking
      • Editing a marking
      • Inspect markings
      • Filtering markings
      • Use-cases for markings
    • 📸Presets
      • Creating a preset
      • Open a preset
    • đŸ—ēī¸Map layers
    • đŸŽĨ3D viewers
  • Integrations and extensions
    • GeoView -integration
    • Pointscene -integration
      • Define the calculation type
      • Select the point cloud
      • Select the LandXML -file
      • Defining the boundary
      • Visualization
      • Results
    • Utilization -extension
      • Utilization report
    • Machine Control -extension
      • Novatron/MOBA Xsite Manage
      • Topcon Sitelink 3D v2
Powered by GitBook
On this page
  • Calculate volume from a triangulated boundary
  • Calculate volume against a LandXML surface
  1. Integrations and extensions
  2. Pointscene -integration

Define the calculation type

PreviousPointscene -integrationNextSelect the point cloud

The first dialog that opens is "Choose calculation type" -dialog.

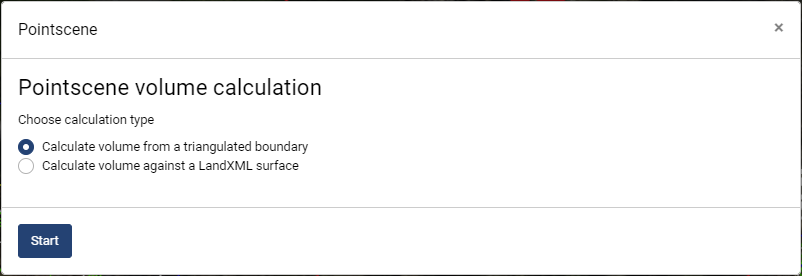
Ultimately there are two different alternatives for the calculation type:

  • Calculate volume from a triangulated boundary

  • Calculate volume against a LandXML surface (Preferred option)

Select the desired option by clicking the toggle button next to the option.

When the volume calculation is done for the first time, it is suggested to use the first option. This allows a small area to be processed, making the first calculation faster.

Once the point cloud is successfully processed, the second option is preferred.

Calculate volume from a triangulated boundary

The first option creates a new triangulated network from defined area. This tool is useful to highligh in the very beginning the cut and fill area.

When site is being built, the information is no longer as informative. During the construction it is suggested to use the other calculation type.

Calculate volume against a LandXML surface

The second option is very useful when the work has begun on the site. Up-to-date information is being compared against the designed state or start state.

This option needs the surface in LandXML. So rather than creating a new TIN from the area, it uses the TIN from a LandXML file.

Once the desired type is selected, continue by clicking Start

Choose calculation type