Be.Smart Site Management
  • â„šī¸What is Be.Smart Site Management?
  • âš™ī¸Requirements
  • 💾Supported file formats
  • 🆕What's new ?
    • Q1/2023 Release
    • Q2/2023 Release
    • Q3/2023 Release
    • Q1/2024 Release
  • Getting started
    • Project set up in Trimble Connect
      • Create a project to Trimble Connect
        • Create a blank project (Trimble Connect)
        • Create a project based on template
      • User management in Trimble Connect environment
      • Project settings in Trimble Connect
    • Project set up in Autodesk Construction Cloud
      • Create a project to ACC
        • Create a blank project (ACC)
      • User management in ACC environment
    • Project set up in Site Management
      • Site Management - Project configuration
        • Coordinate reference system
        • Project location
        • Toggles
        • Coordinate formatting
        • AIS marine traffic
        • Application background maps
        • Background maps
        • Overlay maps
        • Default background map
        • Default models
        • Project links
        • Connections
        • Permissions and Metadata
      • Settings for Site Management
  • Site Management
    • Project interface
      • Toolbar
      • Project tree
      • Map interface
    • 📐Measurement tool
    • 📈Elevation tool
    • âœ‚ī¸Section tool
      • How to create a section
      • Measurements in sections
      • Breaklines in section
      • Print tool in a section
    • đŸ–¨ī¸Print tool
      • Print tool options
    • 📏Inspect breaklines
    • âœī¸Markings
      • Creating a marking
      • Editing a marking
      • Inspect markings
      • Filtering markings
      • Use-cases for markings
    • 📸Presets
      • Creating a preset
      • Open a preset
    • đŸ—ēī¸Map layers
    • đŸŽĨ3D viewers
  • Integrations and extensions
    • GeoView -integration
    • Pointscene -integration
      • Define the calculation type
      • Select the point cloud
      • Select the LandXML -file
      • Defining the boundary
      • Visualization
      • Results
    • Utilization -extension
      • Utilization report
    • Machine Control -extension
      • Novatron/MOBA Xsite Manage
      • Topcon Sitelink 3D v2
Powered by GitBook
On this page
  1. Site Management
  2. Markings

Inspect markings

Markings can be listed in a separate floating window, making it easy to manage larger quantity of these.

PreviousEditing a markingNextFiltering markings

Markings are either linked to Issues or ToDos, depending on which data storage is being used. This also means, that markings can also be created in the data storage. When it is created via the data storage, the marking doesn't have a locational information as a default.

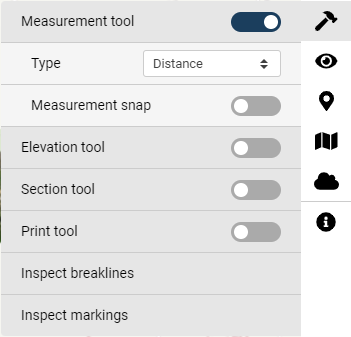
Inspect markings -window lists all of the markings user has a rights to, making it easy to manage these. Inspect markings can be opened from the bottom of the Tools menu:

The Inspect markings -window has few key functionalities. As a preview, it lists all the markings, with the title, description and whether is it visible on the map.

On the top of the window is the search bar, which enable to search text strings from title and description fields. Each of the column can be used to sort the listing.

On the right hand side of the window are located the main functionalities for each marking. The available functionalities change depending on the On map -value. If the marking is visible on the map, clicking the first button will zoom to that specific marking on the map. And Edit -button will allow to make edits to the marking.

If the marking is not on the map, the only possibility in this window is to Add to map. Meaning that user can pinpoint the location for this specific marking.

âœī¸
Tools menu - Inspect markings at the bottom
Inspect markings -window