Be.Smart Site Management
  • â„šī¸What is Be.Smart Site Management?
  • âš™ī¸Requirements
  • 💾Supported file formats
  • 🆕What's new ?
    • Q1/2023 Release
    • Q2/2023 Release
    • Q3/2023 Release
    • Q1/2024 Release
  • Getting started
    • Project set up in Trimble Connect
      • Create a project to Trimble Connect
        • Create a blank project (Trimble Connect)
        • Create a project based on template
      • User management in Trimble Connect environment
      • Project settings in Trimble Connect
    • Project set up in Autodesk Construction Cloud
      • Create a project to ACC
        • Create a blank project (ACC)
      • User management in ACC environment
    • Project set up in Site Management
      • Site Management - Project configuration
        • Coordinate reference system
        • Project location
        • Toggles
        • Coordinate formatting
        • AIS marine traffic
        • Application background maps
        • Background maps
        • Overlay maps
        • Default background map
        • Default models
        • Project links
        • Connections
        • Permissions and Metadata
      • Settings for Site Management
  • Site Management
    • Project interface
      • Toolbar
      • Project tree
      • Map interface
    • 📐Measurement tool
    • 📈Elevation tool
    • âœ‚ī¸Section tool
      • How to create a section
      • Measurements in sections
      • Breaklines in section
      • Print tool in a section
    • đŸ–¨ī¸Print tool
      • Print tool options
    • 📏Inspect breaklines
    • âœī¸Markings
      • Creating a marking
      • Editing a marking
      • Inspect markings
      • Filtering markings
      • Use-cases for markings
    • 📸Presets
      • Creating a preset
      • Open a preset
    • đŸ—ēī¸Map layers
    • đŸŽĨ3D viewers
  • Integrations and extensions
    • GeoView -integration
    • Pointscene -integration
      • Define the calculation type
      • Select the point cloud
      • Select the LandXML -file
      • Defining the boundary
      • Visualization
      • Results
    • Utilization -extension
      • Utilization report
    • Machine Control -extension
      • Novatron/MOBA Xsite Manage
      • Topcon Sitelink 3D v2
Powered by GitBook
On this page
  1. Site Management
  2. Presets

Creating a preset

PreviousPresetsNextOpen a preset

When creating a preset following information can be saved:

  • Map location and zoom level

  • Open models

  • Selected marking filters

  • Selected background map

  • Selected overlay maps and settings

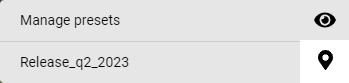
So when creating a preset, keep in mind which information can be shared. Once the wanted files and maps are visible, create a preset by clicking Presets > Manage Presets.

Click New preset to start the creation of a preset.

There are five checkboxes, which define what is being saved to the preset.

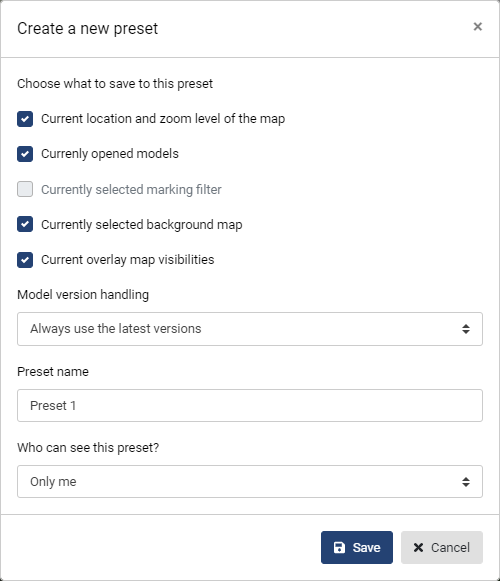
Other options include model version, naming and share settings.

Model version handling -dropdown list has two alternatives; Always use the latest versions and Keep the current versions. This means that if a file is revisioned, will the preset use the latest version or the one that was available when preset was created.

Preset name -field is meant for naming the preset. Use as descriptive name as possible, to ease the usage.

Who can see this preset? -dropdown list has three alternatives; Only me / All project members / Specific users and groups.

Once the settings are as wished, proceed by clicking Save.

If "specific users and groups" -option is selected, then a separate dropdown menu is opened. This dropdown contains all the project users and groups. Select the wanted users and groups and click Save.

📸
Preset menu
Create a new preset -dialog